How to Take, Find, and Print an iPad Screenshot
Proceed to an iPad screen that you would like to capture.
Take the Screenshot
1) Locate the rectangular power button on iPad's short, side edge.
2) Now, locate the iPad's home button, on the screen face of the iPad, circular with a square icon.
3) While holding down power button, press home button twice.
If your iPad's sound is on, you'll hear a camera-shutter sound effect. You'll see a camera-flash visual effect. Then, your iPad will shut off (it shuts off when you release the power button).
Find the Screenshot
1) On any iPad screen, locate the "Photos" icon in the dock area at the bottom (unless you've moved it). The Photos icon is a sunflower on blue sky background.
2) Touch Photos icon. Your screenshot should be the last picture taken in Photos view.
3) Touch your screenshot to open it in fullscreen view.
Printing Options
At this point, your screenshot can be treated like any other picture on your iPad. There are 2 printing options. Print directly from your iPad to a wireless printer. Or, tranfer your screenshot to the computer from which you normally print images and print from there.
Printing Directly from iPad to a Wireless Printer
To print directly from the iPad, your iPad must be configured to recognize external devices and networks. If this is not the case, you must transfer the file to a device that can talk to a printer (see "Printing Elsewhere with iPhoto" below). To continue printing directly from iPad:
1) In fullscreen view, touch your screenshot. Option buttons appear across the top of the screen. A horizontal scrollbar appears below.
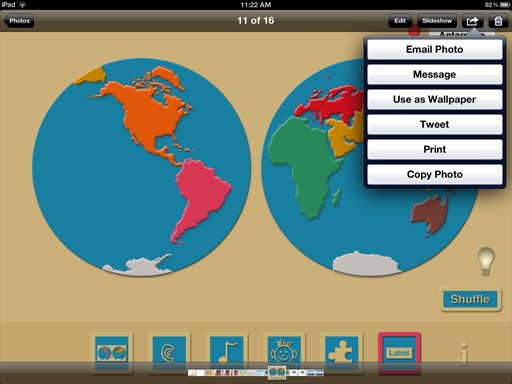
2) At the top right, touch the "arrow jumping out of the box" icon. A menu appears. Here's what it looks like on my iPad 3 screen:

3) If your iPad is set up to work with a wireless printer, you can simply touch Print to open Printer Options.
4) Select your printer (if necessary) and number of copies.
5) Touch "Print" and head to the printer tray to pick up your screenshot.
Printing Elsewhere with iPhoto
If your iPad is not configured to recognize external devices and networks, you must transfer your screenshot to a device that can talk to a printer.
1) Attach your iPad to the computer that you normally use to print documents.
2) If iPhoto does not open automatically when your iPad is attached to the computer, open iPhoto. Wait for your iPad's name to appear in the list on the left.
3) Click on your iPad's name. The window on the right should contain thumbnails of the photos on your iPad separated by status (Already Imported or New Photos).
4) Locate your screenshot in the New Photos section. It should be the last one.
5) Click on your screenshot to select it. It will now have a gold outline.
6) At the top of the right window, click on "Import Selected." The screenshot is copied onto the computer.
7) Scan the list that appears in the left window to locate and select "Last Import" (near the top).
8) When your screenshot appears on the right, select it.
9) Pull down the iPhoto File menu and select "Print."
10) Click "OK" and head to the printer tray to collect your screenshot.
To return to TenSun's Extras page, touch here.